

The Espressif IoT Development Framework (esp-idf) is the official development platform for the ESP32 and ESP32-S series of SoCs from Fabless Semiconductor designer Espressif Systems.
Espresif have developed the IDF eclipse plugin to make the setup and integration of the esp-idf with the eclipse IDE simple and relatively painless.
Installation consists of four main steps:
- Install the Eclipse IDE
- Install the Espressif IDF Plugin for Eclipse
- Download and configure the esp-idf
- Install the esp-idf build tools
Once installed, we run through the basics:
This tutorial will work you through setting up Eclipse 2020-09 on ubuntu 20.04.1 LTS (Long Term Support). It assumes you already have a fresh copy of ubuntu 20.04.1 installed.
Prerequisites
Before installing the IDE, start by installing some dependencies for the esp-idk.
sudo apt-get update
sudo apt-get install git python-is-python3 python3-pip python3-setuptools
The ESP-IDF Tools Manager will help us install the rest of the required dependencies.
Eclipse IDE
To setup Eclipse on ubuntu 20.04.1 LTS, simply download and extract eclipse. As the esp-idf framework is written in C, you will want to get the Eclipse IDE for C/C++ Developers version.
(Eclipse also has a package titled Eclipse IDE for Embedded C/C++ Developers. This is the same C/C++ IDE but is bundled with the Eclipse Embedded CDT ARM/Risc V plugins. ESP32s are designed around a Tensilica Xtensa LX6 CPU and requires a different framework)
To make things even easier, the Java Runtime Environment now comes bundled with eclipse since version 2020-09 meaning you no longer have to download and install JRE separately.
wget https://download.eclipse.org/technology/epp/downloads/release/2020-09/R/eclipse-cpp-2020-09-R-linux-gtk-x86_64.tar.gz
tar -xzf eclipse-cpp-2020-09-R-linux-gtk-x86_64.tar.gz
eclipse/eclipse
Espressif IDF Plugin for Eclipse
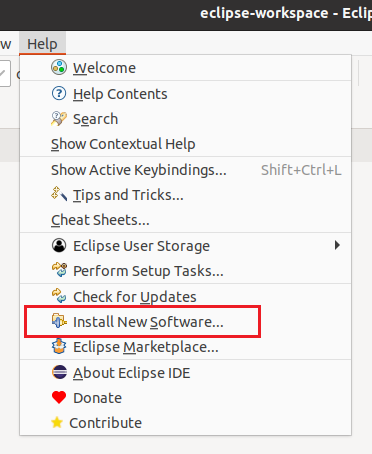
Once Eclipse has loaded, select Install New Software from the Help menu:
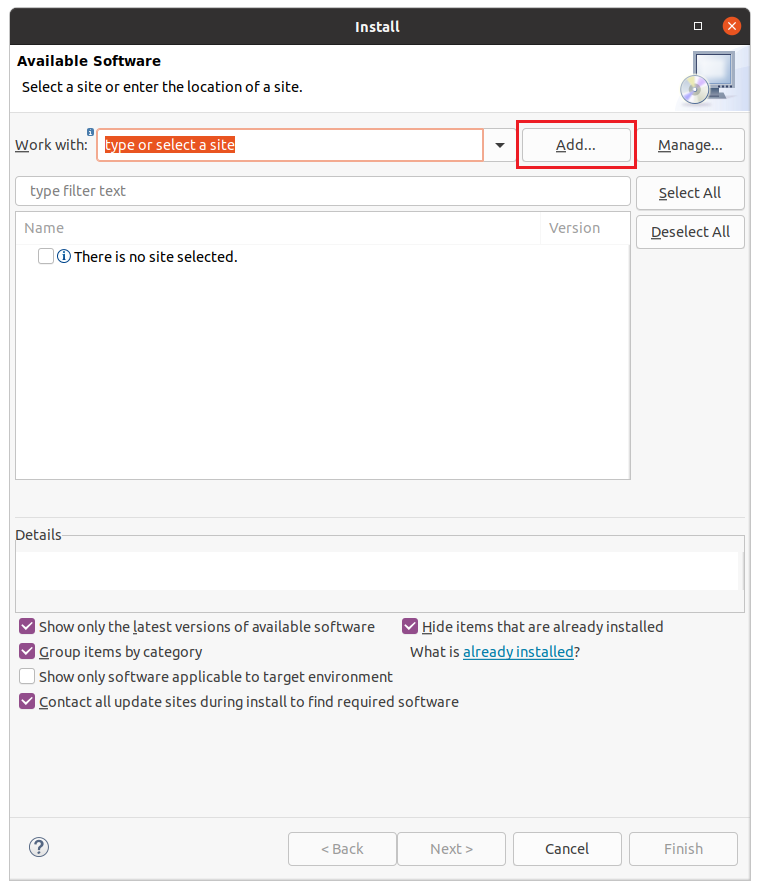
Click Add to add a third party repository:
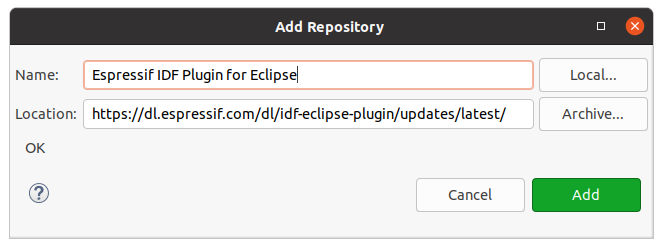
Enter the following:
Name: Espressif IDF Plugin for Eclipse
Location: https://dl.espressif.com/dl/idf-eclipse-plugin/updates/latest/
And click Add.
Expand Espressif IDF to get a list of options to install. It is recommended to install all the options. To do this click Select All.
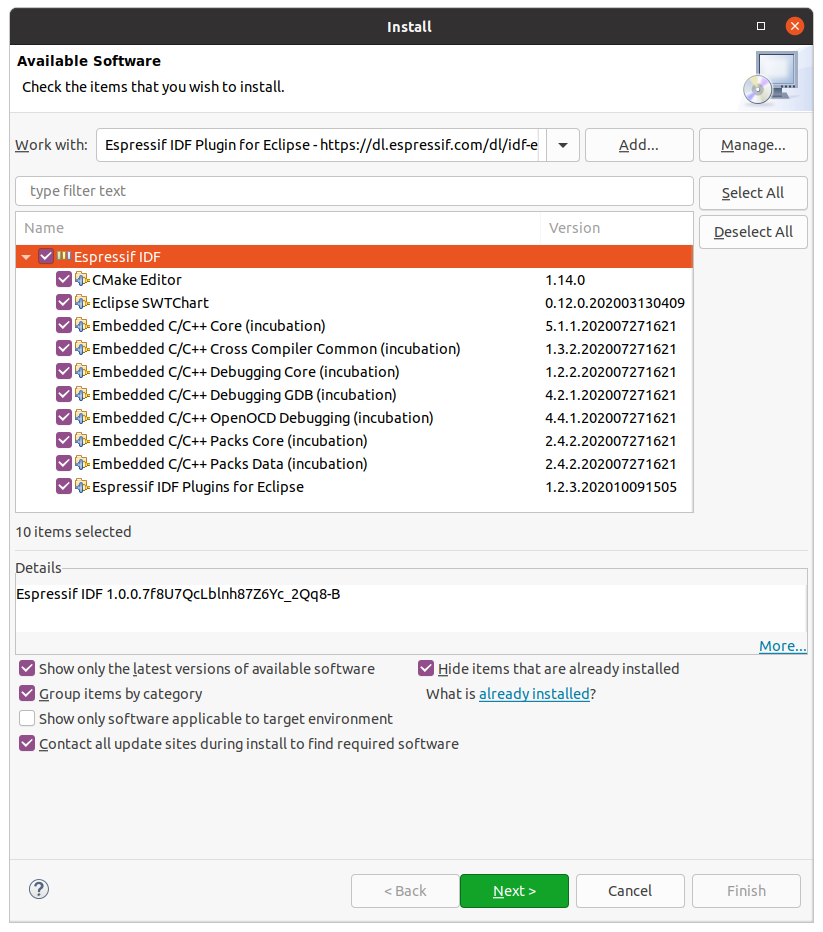
Click Next to continue.
Review the items you intend to install and click Next to proceed.
Now review and accept the terms of the licence agreements.
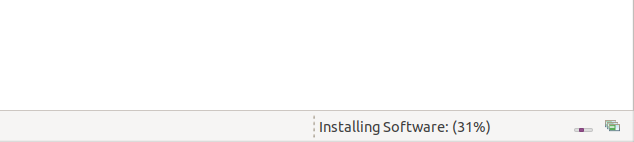
Progress will be indicated in the bottom right hand corner of the IDE:
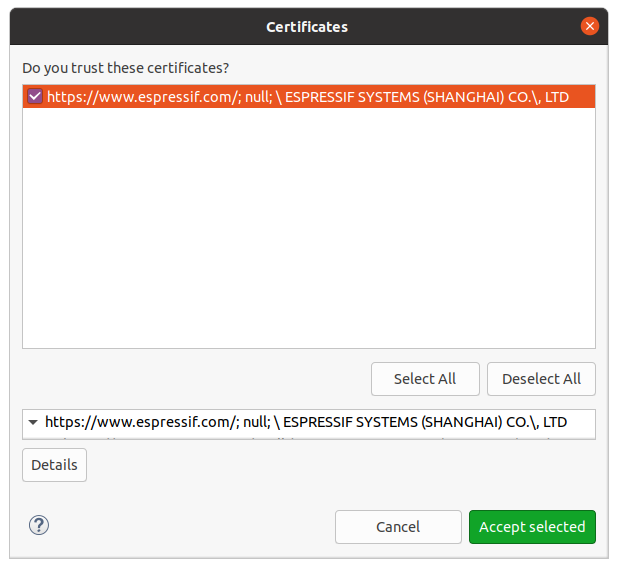
About halfway through the installation, you may receive a security warning indicating you are installing unsigned software. Click install anyway.

Select the certificate (ensure it is ticked) and click Accept Selected.
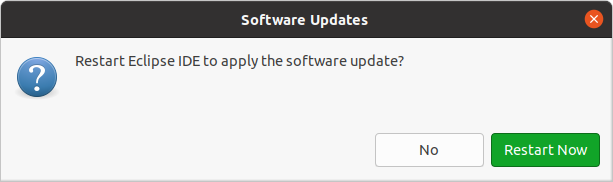
Finally, restart Eclipse to apply the Plugin.
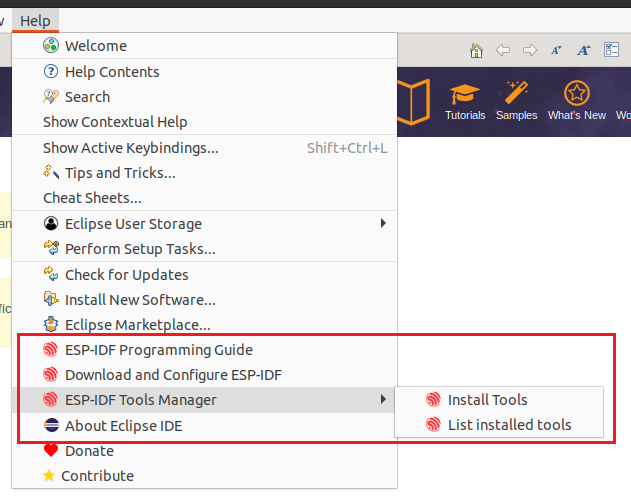
Upon restarting Eclipse, you should now have Espressif tools in the help menu.
Download and Configure ESP-IDF
The esp-idf can be downloaded via the Espressif plug-in helper or on the command line using GIT.
To use the plug-in, from the help menu, select Download and Configure ESP-IDF to bring up the following dialog box.
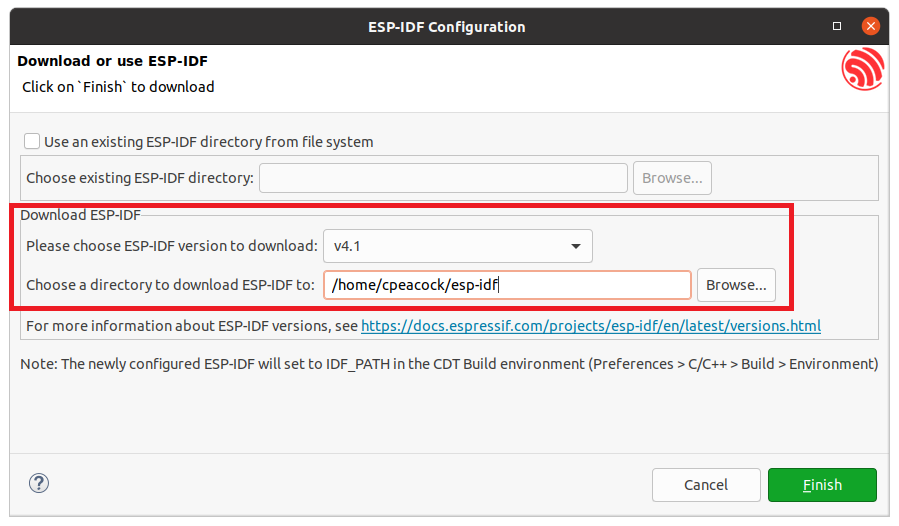
Select your ESP-IDF version. At the time of writing, version 4.1 is the latest stable release. And choose a directory to download the IDF into.
Click Finish. Progress is shown both in the bottom right hand corner status bar and in the progress tab.
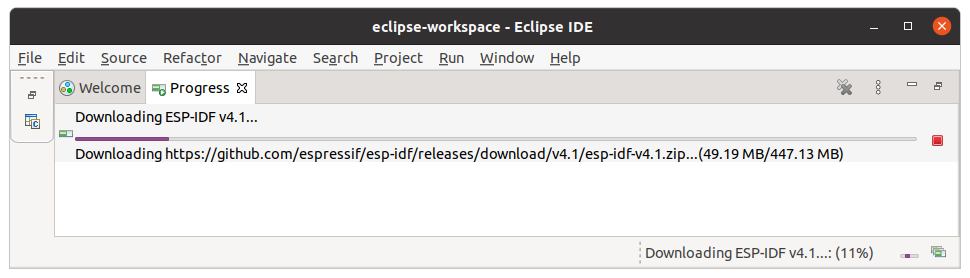
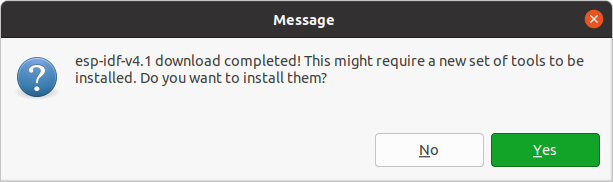
Once downloading has commenced, the IDE will prompt if you want to install the build tools. Click yes, to advance to the next stage.
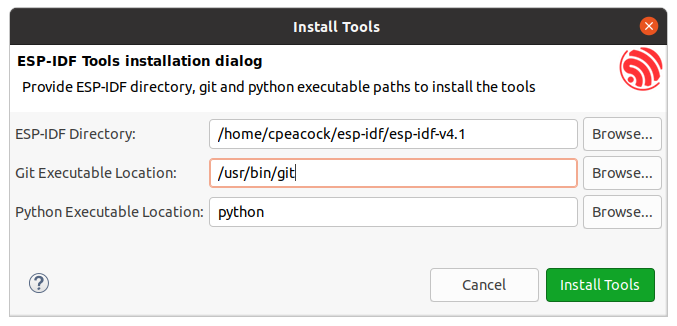
Install the ESP-IDF Build Tools
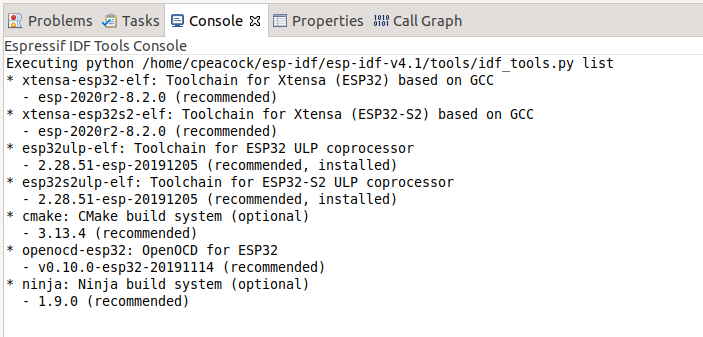
With the esp-idf downloaded, the next stage is to install the build tools. If the following dialog is not open as a result of the last process, Select Help -> ESP-IDF Tools Manager -> Install Tools.

The following tools are installed:
(This can be displayed by selecting Help -> ESP-IDF Tools Manager -> List Installed Tools)
USB Serial Port Permissions
By default, users do not have access to the serial ports needed to download code to the ESP32 bootloader.
On ubuntu, members of the dialout group have access to the serial ports. To add the current user to the dialout group execute:
sudo usermod -a -G dialout $USER
This will require the user to log out and back in to become effective.
Importing an IDF Project
The best way to test the IDE and toolchain is to import an existing example such as ‘blink’ found in esp-idf/examples/get-started/blink.
To import the project, select Import from the File Menu. It will show the dialog below:
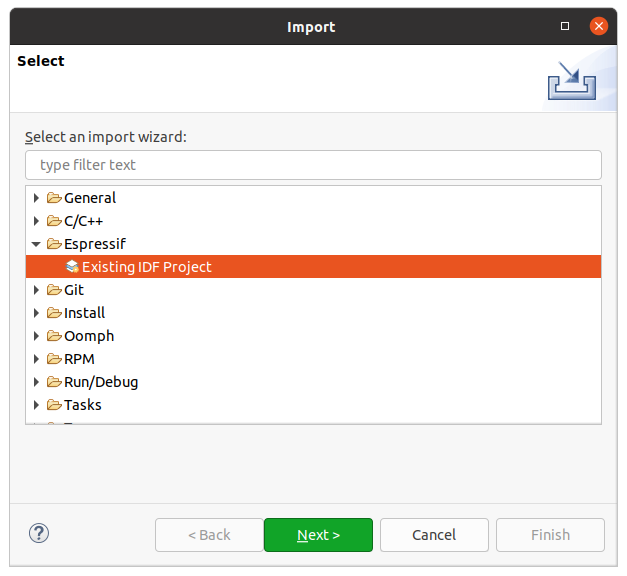
Select Existing IDF Project under the Espressif category and click Next.
Give your project a suitable name and click browse and find the blink example in your esp-idf folder:
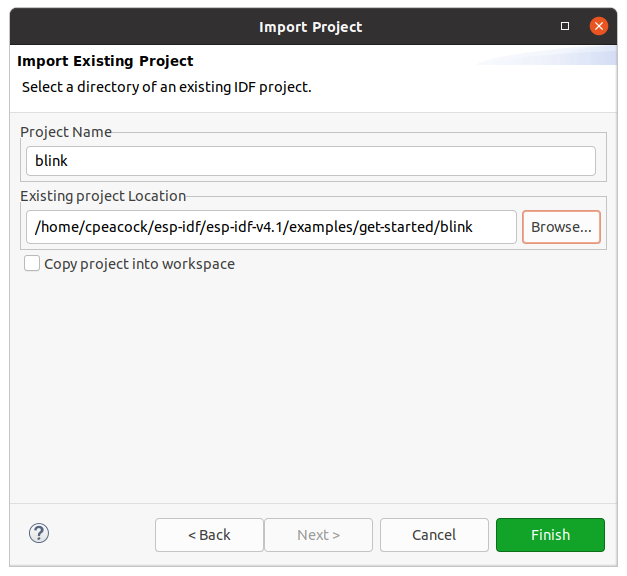
And click Finish. The example Blink project should now be loaded into the IDE.
Building
To build the project, you can click on the hammer icon in the top left hand corner of the IDE.

However, if you try to build the project now, you should get the error message “No Toolchain found for Target Local”.
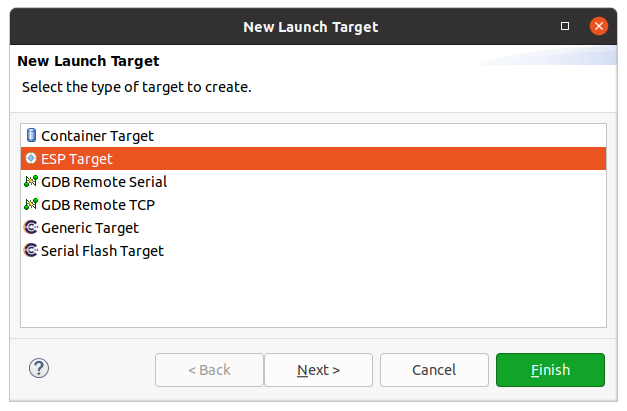
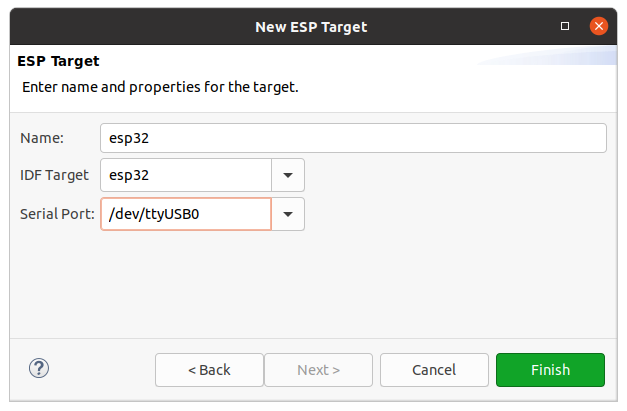
Before we can build the source, we must create a target. To to this, click on the third drop down box in the toolbar and click on “New Launch Target…”

Now select ESP Target as the launch target we would like to create:
And give it a name and select the serial port connected to your ESP32 target. You can add multiple targets on different serial ports.
Now click on build. Your blink code should successfully build.
Flashing
With your code compiled, the next step is to download it to your ESP32 over the serial port. The ESP32 has a serial bootloader in ROM.
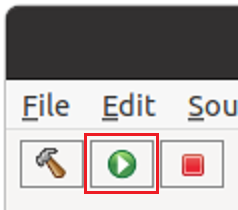
To flash your program, click the run button (Green ‘play’ button).
Check your console for any error messages.
[1/4] cd /home/cpeacock/esp-idf/esp-idf-v4.1/examples/get-started/blink/build/esp-idf/partition_table && /home/cpeacock/.espressif/tools/cmake/3.13.4/bin/cmake -E echo "Partition table binary generated. Contents:" && /home/cpeacock/.espressif/tools/cmake/3.13.4/bin/cmake -E echo "*******************************************************************************" && /home/cpeacock/.espressif/python_env/idf4.1_py3.8_env/bin/python /home/cpeacock/esp-idf/esp-idf-v4.1/components/partition_table/gen_esp32part.py -q --offset 0x8000 --flash-size 2MB /home/cpeacock/esp-idf/esp-idf-v4.1/examples/get-started/blink/build/partition_table/partition-table.bin && /home/cpeacock/.espressif/tools/cmake/3.13.4/bin/cmake -E echo "*******************************************************************************"
Partition table binary generated. Contents:
*******************************************************************************
# Espressif ESP32 Partition Table
# Name, Type, SubType, Offset, Size, Flags
nvs,data,nvs,0x9000,24K,
phy_init,data,phy,0xf000,4K,
factory,app,factory,0x10000,1M,
*******************************************************************************
[2/4] Performing build step for 'bootloader'
ninja: no work to do.
esptool.py -p /dev/ttyUSB1 -b 460800 --before default_reset --after hard_reset --chip esp32 write_flash --flash_mode dio --flash_freq 40m --flash_size 2MB 0x8000 partition_table/partition-table.bin 0x1000 bootloader/bootloader.bin 0x10000 blink.bin
esptool.py v2.9-dev
Serial port /dev/ttyUSB1
Connecting....
Chip is ESP32D0WDQ5 (revision 3)
Features: WiFi, BT, Dual Core, 240MHz, VRef calibration in efuse, Coding Scheme None
Crystal is 40MHz
MAC: 7c:9e:bd:cf:6f:70
Uploading stub...
Running stub...
Stub running...
Changing baud rate to 460800
Changed.
Configuring flash size...
Compressed 3072 bytes to 103...
Writing at 0x00008000... (100 %)
Wrote 3072 bytes (103 compressed) at 0x00008000 in 0.0 seconds (effective 1551.6 kbit/s)...
Hash of data verified.
Compressed 24064 bytes to 14893...
Writing at 0x00001000... (100 %)
Wrote 24064 bytes (14893 compressed) at 0x00001000 in 0.4 seconds (effective 546.7 kbit/s)...
Hash of data verified.
Compressed 147616 bytes to 77003...
Writing at 0x00010000... (20 %)
Writing at 0x00014000... (40 %)
Writing at 0x00018000... (60 %)
Writing at 0x0001c000... (80 %)
Writing at 0x00020000... (100 %)
Wrote 147616 bytes (77003 compressed) at 0x00010000 in 1.8 seconds (effective 647.6 kbit/s)...
Hash of data verified.

Leaving...
Hard resetting via RTS pin...
Adding "flash"'s dependency "all" to list of commands with default set of options.
Executing action: all (aliases: build)
Running ninja in directory /home/cpeacock/esp-idf/esp-idf-v4.1/examples/get-started/blink/build
Executing "ninja all"...
Executing action: flash
Running esptool.py in directory /home/cpeacock/esp-idf/esp-idf-v4.1/examples/get-started/blink/build
Executing "/home/cpeacock/.espressif/python_env/idf4.1_py3.8_env/bin/python /home/cpeacock/esp-idf/esp-idf-v4.1/components/esptool_py/esptool/esptool.py -p /dev/ttyUSB1 -b 460800 --before default_reset --after hard_reset --chip esp32 write_flash @flash_project_args"...
Done
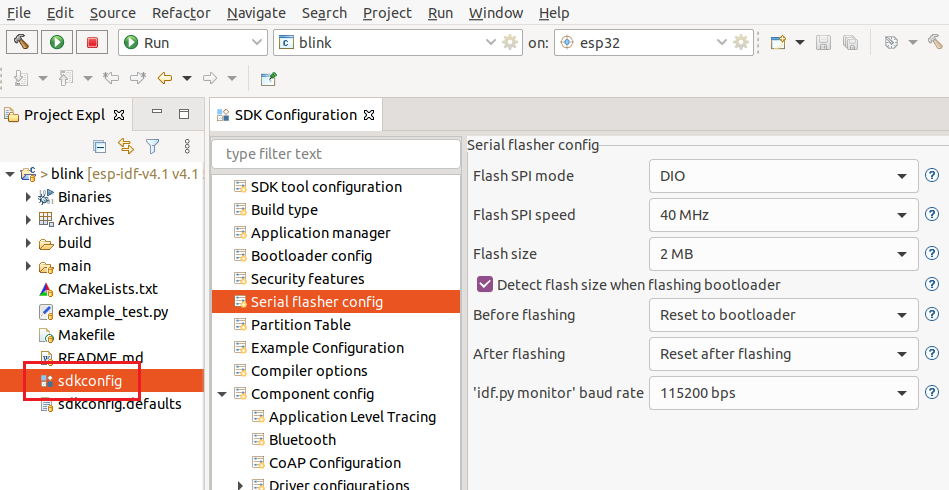
SDK Config
Double clicking on sdkconfig in your project file tree will open up the SDK Configuration. In this window, you can configure the many aspects of your project including what SDK components are built and linked (Bluetooth, WiFi, Ethernet, http, SPIFFS, OpenSSL etc) as well as memory maps/partition tables, serial flasher and bootloader configs etc.
Great tutorial, it might be useful to add a hint to
enable “auto complete”.
In (Window -> Preferences -> C/C++ -> Editor -> Content Assist -> Advanced) check
Parsing based Proposal.
It’s not always enabled by default and very hard to find, if one is new to eclipe
I got the same result shown in the picture behind
“The following tools are installed:
(This can be displayed by selecting Help -> ESP-IDF Tools Manager -> List Installed Tools)”
but, when I click the project name, the “hammer” was always unable, and when I clicked the “Build all” button, here is the prompt in console:
CMake Warning at /home/mq/esp/esp-idf-v4.3/tools/cmake/project.cmake:303 (message):
enabled ccache in build but ccache program not found
Call Stack (most recent call first):
CMakeLists.txt:6 (project)
CMake Error at /home/mq/esp/esp-idf-v4.3/tools/cmake/build.cmake:274 (message):
Some Python dependencies must be installed. Check above message for
details.
Call Stack (most recent call first):
/home/mq/esp/esp-idf-v4.3/tools/cmake/build.cmake:400 (__build_check_python)
/home/mq/esp/esp-idf-v4.3/tools/cmake/project.cmake:396 (idf_build_process)
CMakeLists.txt:6 (project)
How to fix it?
A complete super installation guide. It works at the first moment.
Especially the note for pyhton and for the tty access for the user.
One note: I don’t know if it was my failure, but if have to install ccache (running Mint)
May be we can write a tutorial to create a project with out the examples. I haven’t tried it.
THANKS
P.S.
I Have lost two days to install it with other stu..p.. guides. Yours is perfect.
May be you can update the screen shoots. But with some brain it is anyway possible
Hi thanks by the help!
Just one (and I hope helpful) observation in the step “Install the ESP-IDF Build Tools”.
In my case (Ubuntu 18.04.6 LTS) I have 3 python versions (2.7 , 3.6 and 3.9) so if not set the python executable to > than 3.8 (/usr/bin/python3.9 i.e) is showed an error related with _lzma module import (I also install the python-lzma package with sudo apt-get install python-lzma but I not sure if this have some effect in the solution)
Regards!