U-Boot
U-Boot (The Universal Bootloader) is a popular, feature rich, open source bootloader for embedded systems. It is licenced under the GNU General Public Licence version 2.
While its primary purpose is to boot an operating system, such as Linux, it also provides many useful tools for developing and debugging embedded systems.
This includes support for many common file-systems including FAT, ext3, ext4, NFS etc and interfaces such as USB, Ethernet (IP), MMC and even Asynchronous Serial (Kermit/xmodem/ymodem). This allows the developer to load new images and file-systems from a variety of sources for testing and/or reflashing.
It also includes an environment variable engine allowing for easy configuration.
Understanding the Raspberry Pi Boot Process
More traditional embedded systems contain on-board flash memory mapped at the reset vector. Upon reset, the CPU will start loading instructions beginning at the reset vector. In these systems, U-Boot is normally flashed into non-volatile memory at the reset vector. The on-board flash may also include an environment variable space, the Linux kernel and filesystem.
To reduce cost, the Raspberry Pi (with the exception of the compute module) omits any on-board non-volatile memory. Rather, a SD/MMC card slot is provided for this purpose. This also offers convenience – in some environments – as SD cards are not only cheap, but easy to swap out and upgrade.
The VideoCore GPU is responsible for booting the Broadcom BCM283x system on a chip (SoC), contained on the Raspberry Pi. The SoC will boot up with its main ARM processor held in reset.
The VideoCore GPU loads the first stage bootloader from a ROM embedded within the SoC. This extremely simple first stage bootloader is designed to load the second stage bootloader from a FAT32 or FAT16 filesystem located on the SD Card.
The second stage bootloader – bootcode.bin – is executed on the VideoCore GPU and loads the third stage bootloader – start.elf. Both these bootloaders are closed firmware, available as binary blobs from Broadcom.
The third stage bootloader – start.elf – is where all the action happens. It starts by reading config.txt, a text file containing configuration parameters for both the VideoCore (Video/HDMI modes, memory, console frame buffers etc) and the Linux Kernel (load addresses, device tree, UART/console baud rates etc).
Once the config.txt file has been parsed, the third stage bootloader will load cmdline.txt – a file containing the kernel command line parameters to be passed to the kernel and kernel.img – the Linux kernel. Both are loaded into shared memory allocated to the ARM processor. Once complete, the third stage bootloader will release the ARM processor from reset. Your kernel should now start booting.
Hence, the Linux kernel can be booted without the need of U-Boot. However, as indicated U-Boot provides many useful tools for developing and debugging embedded systems such as loading a newly compiled kernel via TFTP over the network for testing. This eliminates the slow and painful process of copying the Kernel to SD Card between each tweak and compilation.
Prerequisites
To compile the U-Boot bootloader for the Raspberry Pi, you must first have the GCC cross-compiler and device tree compiler installed.
Assuming Ubuntu 18.04 as your build system, install these prerequisites:
apt-get install gcc-arm-linux-gnueabi
apt-get install device-tree-compiler
Download U-Boot Source Code
Download and extract the latest mainline version of U-Boot:
wget ftp://ftp.denx.de/pub/u-boot/u-boot-2018.09.tar.bz2
tar -xjf u-boot-2018.09.tar.bz2
cd u-boot-2018.09
Cross-Compiling
To cross compile U-Boot for your ARM processor, first clean the distribution:
make CROSS_COMPILE=arm-linux-gnueabi- distclean
Next, set the default configuration. This will vary depending upon the Raspberry Pi variant you wish to target:
| Raspberry PI Variant | Processor | Configuration File |
| Raspberry PI Model A | BCM2835 | rpi_defconfig |
| Raspberry PI Model A+ | BCM2835 | rpi_defconfig |
| Raspberry PI Model B+ | BCM2835 | rpi_defconfig |
| Raspberry PI Compute Module | BCM2835 | rpi_defconfig |
| Raspberry PI Zero | BCM2835 | rpi_defconfig |
| Raspberry PI Zero W | BCM2835 | rpi_0_w_defconfig |
| Raspberry PI 2 Model B | BCM2836 | rpi_2_defconfig |
| Raspberry PI 3 Model B | BCM2837 | rpi_3_defconfig |
| Raspberry PI 3 Model B+ | BCM2837B0 | rpi_3_defconfig |
For example, if we target the Raspberry PI Model B+, run:
make CROSS_COMPILE=arm-linux-gnueabi- rpi_defconfig
and finally compile U-Boot:
make CROSS_COMPILE=arm-linux-gnueabi- u-boot.bin
Once compiled, u-boot.bin can be copied to your SD Card.
Preparing a SD Card
The Raspberry Pi’s first stage bootloader will boot from either a FAT16 or FAT32 partition. First, partition the card using fdisk where /dev/sdb is your SD/MMC block device:
sudo fdisk /dev/sdb
You will now be presented with a menu. First select p (print the partition table) and ensure you have selected the right disk.
If the disk is correct, delete any existing partitions.
Now select n to add a new partition. Select primary partition and any other defaults.
The default partition will now be set for linux. Select t to change a partition’s system ID and enter b (W95 FAT32).
Finally, write the partition table to disk and exit by selecting w.
Now format the SD card:
sudo mkfs.vfat /dev/sdb1
And mount the new file system, so you can add the required files:
sudo mount -t vfat /dev/sdb1 /media/card
Copy the following files over to your freshly formatted SD/MMC card:
bootcode.bin
start.elf
config.txt
cmdline.txt
u-boot.bin
You can obtain bootcode.bin and start.elf from the Raspberry Pi Git Repository:
wget https://github.com/raspberrypi/firmware/raw/master/boot/bootcode.bin
wget https://github.com/raspberrypi/firmware/raw/master/boot/start.elf
Create the config.txt file and add the following line:
kernel=u-boot.bin
This will tell the third stage bootloader to load u-boot.bin rather than the Linux kernel, kernel.img.
Once you are finished configuring your SD Card, unmount the disk and insert it into your Raspberry Pi:
sudo umount /media/card
Console
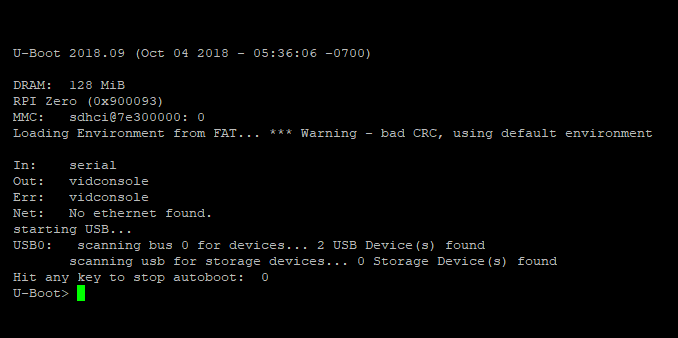
When booting, the console is available using a HDMI display and USB keyboard, and via the UART (Pin 8:TXD, Pin 10:RXD) @ 115,200bps.


Also required
apt-get install bison flex
An attempt to build as follows:
(on kubuntu 18.04)
make CROSS_COMPILE=arm-linux-gnueabi- distclean
make CROSS_COMPILE=arm-linux-gnueabi- rpi_3_defconfig
make CROSS_COMPILE=arm-linux-gnueabi- u-boot.bin
gives compilation errors:
{standard input}: Assembler messages:
{standard input}:36: Error: unexpected character `n’ in type specifier
{standard input}:36: Error: bad instruction `b.ne 1b’
scripts/Makefile.build:278: recipe for target ‘arch/arm/cpu/armv8/cpu.o’ failed
make[1]: *** [arch/arm/cpu/armv8/cpu.o] Error 1
Makefile:1408: recipe for target ‘arch/arm/cpu/armv8’ failed
I also tried:
make CROSS_COMPILE=arm-linux-gnueabi- rpi_defconfig
make CROSS_COMPILE=arm-linux-gnueabi- u-boot.bin
and
make CROSS_COMPILE=arm-linux-gnueabi- rpi_2_defconfig
make CROSS_COMPILE=arm-linux-gnueabi- u-boot.bin
The both buildings (with rpi_defconfig and rpi_2_defconfig) are OK !
but that is not my board case !!!
@valeri – The RPi-3-B is a 64bit system. The instructions from this article guide the reader to use ‘CROSS_COMPILE=arm-linux-gnueabi-‘, but that is for a 32bit system, so your symbols are not being interpreted correctly during the make process.
Try:
1. Install Packages (Most will likely be on your system already)
apt install crossbuild-essential-arm64 bison flex device-tree-compiler pkg-config ncurses-dev libssl-dev git gcc-aarch64-linux-gnu
2. Building Instructions for U-Boot
make CROSS_COMPILE=arm-linux-gnueabi- distclean
make CROSS_COMPILE=arm-linux-gnueabi- rpi_3_defconfig
(NOTE: Check out the .config file and try to understand what’s going on. Then go look at the file: /u-boot-2018.09/arch/arm/cpu/armv8/u-boot-spl.lds. Here you can see the variable OUTPUT_ARCH(aarch64), and why it was important to use the 64bit compiler.)
3. Finally… u-boot.bin
make CROSS_COMPILE=arm-linux-gnueabi- u-boot.bin
That should work for you.
I’ve ran all of your mentioned command. but i got the same error yet.
I have RPi model 3B
i tried:
sudo apt install crossbuild-essential-arm64 bison flex device-tree-compiler pkg-config ncurses-dev libssl-dev git gcc-aarch64-linux-gnu
make CROSS_COMPILE=arm-linux-gnueabi- distclean
make CROSS_COMPILE=arm-linux-gnueabi- rpi_3_defconfig
make CROSS_COMPILE=arm-linux-gnueabi- u-boot.bin
hi, you need to change CROSS_COMPILE to use CROSS_COMPILE=aarch64-linux-gnu-
so you should invoke
make CROSS_COMPILE=aarch64-linux-gnu- rpi_3_defconfig
make CROSS_COMPILE=aarch64-linux-gnu- u-boot.bin
refrence https://elinux.org/RPi_U-Boot#Compile_the_source
you can run `make rpi_3_32b_defconfig` if you want to a 32bit uboot. I have the same problem as you, but I don’t want a 64bit uboot and the kernel will compile to 64bit.
Hi , I have ran also “make CROSS_COMPILE=aarch64-linux-gnu- u-boot.bin ” , but i am getting this type of error;
mahannee@VTA076L:~/u-boot/u-boot-2018.09$ make CROSS_COMPILE=aarch64-linux-gnu- u-boot.bin
scripts/kconfig/conf –syncconfig Kconfig
CHK include/config.h
UPD include/config.h
CFG u-boot.cfg
GEN include/autoconf.mk
GEN include/autoconf.mk.dep
*** Your GCC is older than 6.0 and is not supported
arch/arm/config.mk:66: recipe for target ‘checkgcc6’ failed
make: *** [checkgcc6] Error 1
My raspberry pi has 1Gb o RAM, why does u-boot only recognizes 128?
Where do I find config.txt and cmdline.txt ?
Hi,
slightly in line with the article… I have a question about your wiki article
“Understanding the Raspberry Pi Boot Process”
(and can’t find any other way to contact you 🙂 ).
How is the contents of the “cmdline.txt” and your mentioned additional
parameters passed to the kernel.img which is loaded after the “start.elf”?
Are these values stored at a fixed address? Or are they passed in some registers?
Any insights on this would be extremely helpfull.
Thx
Chris
Spinning my wheels for two days now. I’m not seeing anything on my uart console during boot. The green leds flicker a bit and go red. Console stays blank. I’ve tried following many different write-ups, same results. If I change command.txt from kernel=u-boot.bin back to kernel-zImage I can follow the entire boot process on my uart connection, no problem. Raspberry pi-3B (not plus)
My u-boot compile process is:
make CROSS_COMPILE=arm-linux-gnueabi- distclean
make CROSS_COMPILE=aarch64-linux-gnu- rpi_3_defconfig
make CROSS_COMPILE=aarch64-linux-gnu- u-boot.bin
No errors (copied to boot partition on SD card)
Set kernel=u-boot in command.txt
Buildroot was used with raspberrypi3_defconfig (basic skeleton system with a banner change and root login added).
Any help would be greatly appreciated.